
Pipeline - Assessments
Online assessments are an integral part of modern hiring practices, enabling you to objectively measure candidates' skills, knowledge, and abilities. By integrating tailored tests into your pipeline, you can efficiently screen candidates and identify those best suited for the role. These assessments ensure fairness, provide a structured evaluation process, and reduce bias, supporting more informed hiring decisions.
In Zamdit, online assessments are fully customizable, allowing you to create or import tests that align with the specific requirements of a job. With diverse question types and automated scoring, assessments save time while offering valuable insights into candidates' capabilities. Whether you're evaluating technical proficiency, cognitive abilities, or role-specific expertise, online assessments streamline your decision-making process and help you focus on the most qualified applicants.
Overview
When creating a pipeline from a template, the general setup and candidate feedback form for Online Assessment stages can be pre-populated from their corresponding templates. If no template is configured, or if a new stage is added, you must add and configure the assessment manually. Setting up assessments is mandatory to publish a job.
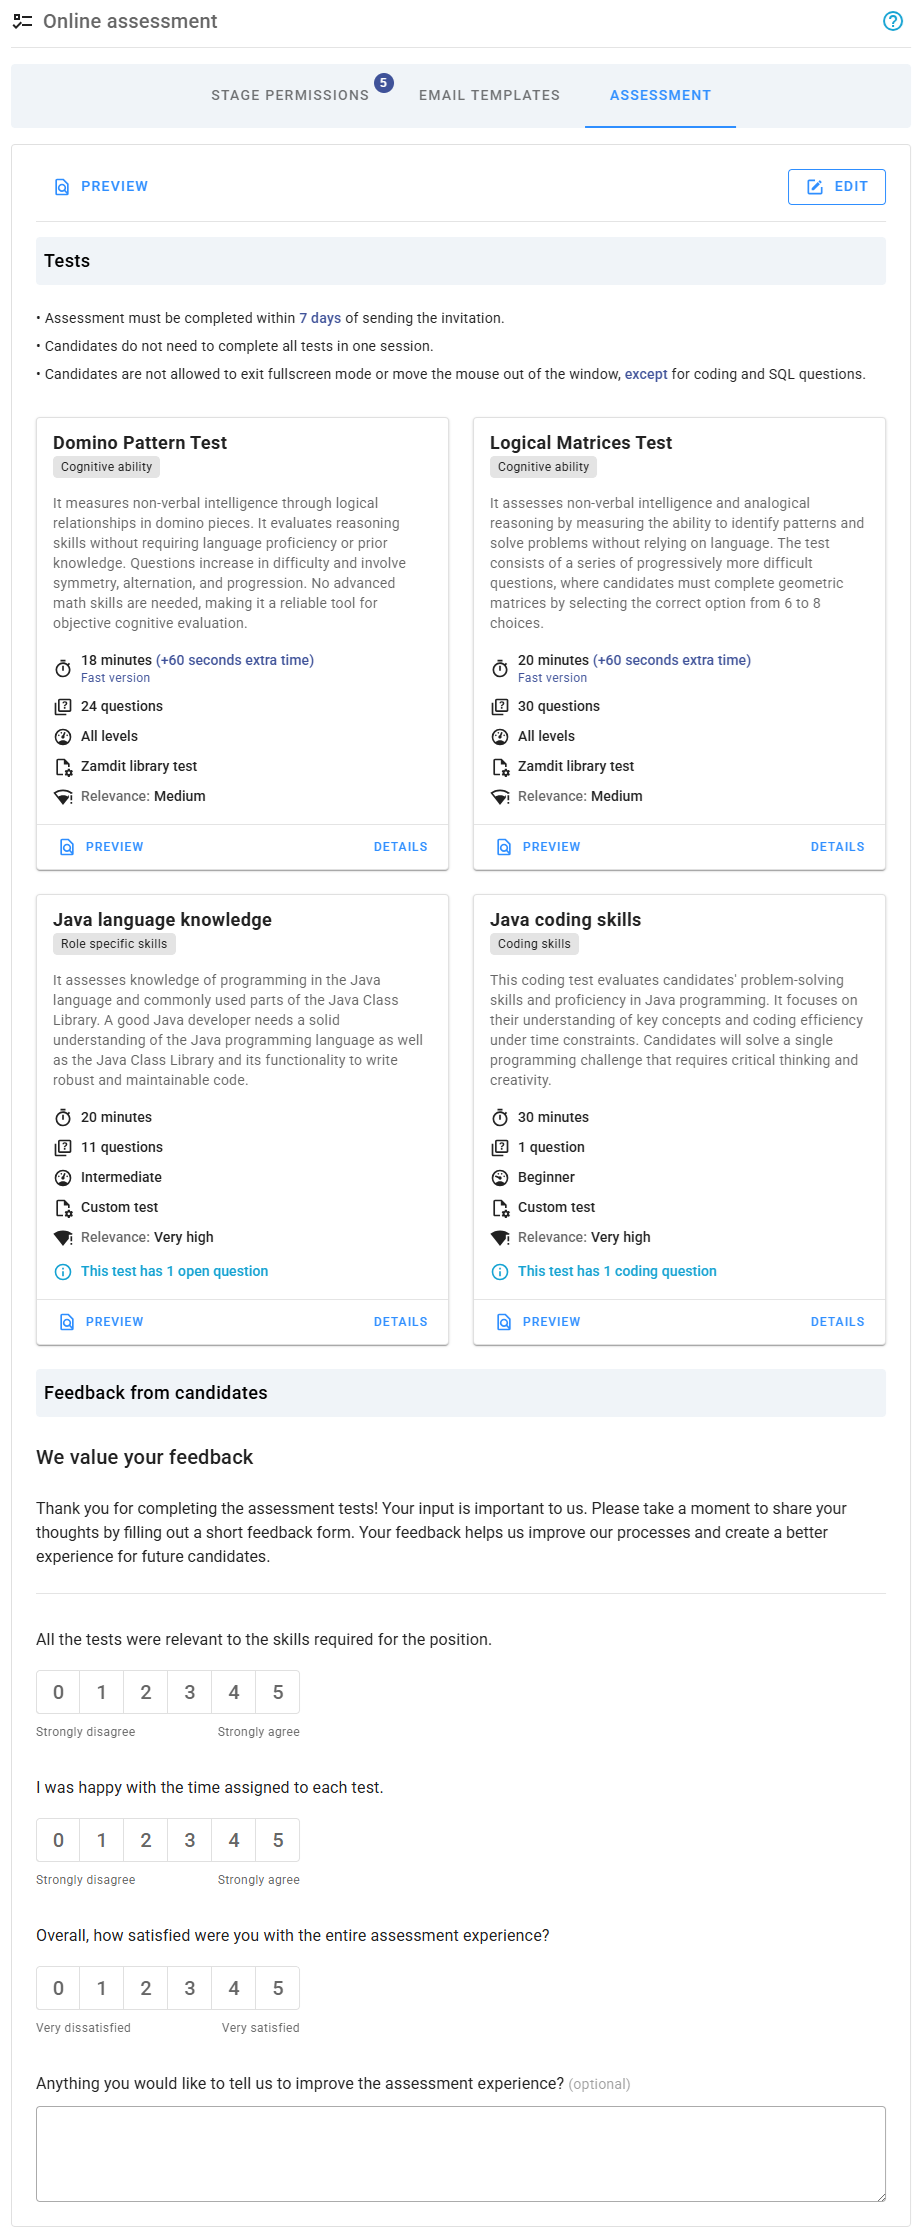
This section displays a summary of the assessment setup, including the selected tests, any custom welcome or thank-you messages, and a preview of the candidate feedback form (if included). To see the candidate experience, complete with welcome and thank-you messages, click the Preview button.
Editing assessments
When adding or editing an assessment, the configuration is organized into four sections: heading and texts, tests, behavior settings, and candidate feedback forms. You can build these sections from scratch or use templates (if available) for all sections except the tests, which must always be manually added. Changes are saved only when you click Save.
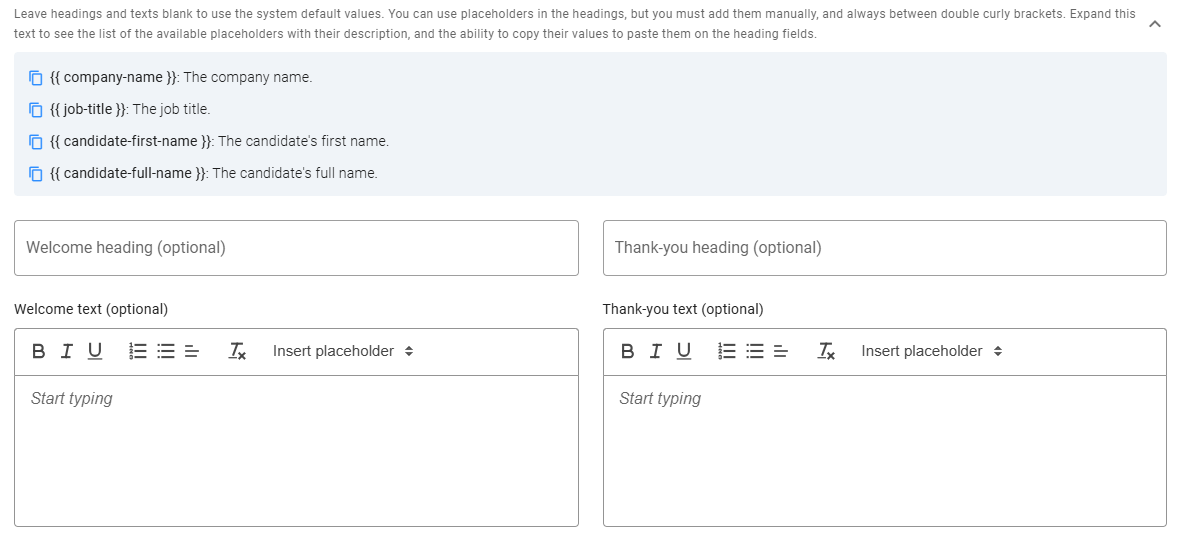
Heading and texts
Customize the Welcome and Thank-you messages displayed at the beginning and end of assessments. Default messages are available, but you can tailor headings and texts as needed. Use placeholders (listed at the top of this section) for dynamic content. To copy a placeholder, click the icon next to it.
Tests
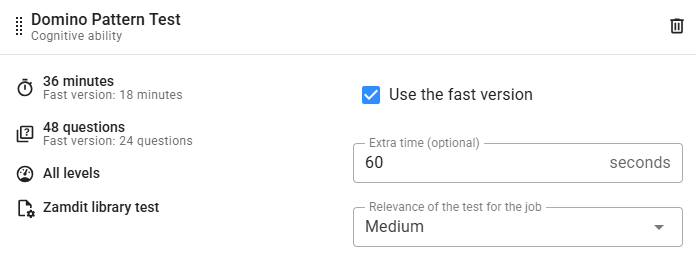
Add, set up, and reorder up to six tests from this panel. Select and add tests by clicking the Plus icon, and then configure them using the available fields:
- Use the fast version: Available for tests offering a condensed version with fewer questions.
- Extra time: Add extra seconds to the test duration if needed.
- Code languages: For system coding tests, specify the programming languages candidates can use, or leave blank to allow all supported languages.
- Relevance of the test for the job: Assign a relevance level, which helps provide a more accurate overall score for candidates.
Behavior settings
Adjust candidate experience with the following options:
- Request Fullscreen and Mouse in Window for Coding Questions: Enforces fullscreen and restricts mouse movements for coding questions. For other question types, these settings are always enforced.
- Require Continuous Completion of All Tests: Requires candidates to finish all tests in one session, allowing only short breaks between tests.
- Days to Complete the Assessment After Invitation was Sent: Sets the deadline for assessment completion based on the invitation date.
- Days to Complete the Assessment After First Access: Sets an optional expiration based on the candidate’s first access.
- Maximum Rest Time Between Tests: Limits the time candidates can rest between tests when continuous completion is enforced.
Candidate feedback forms
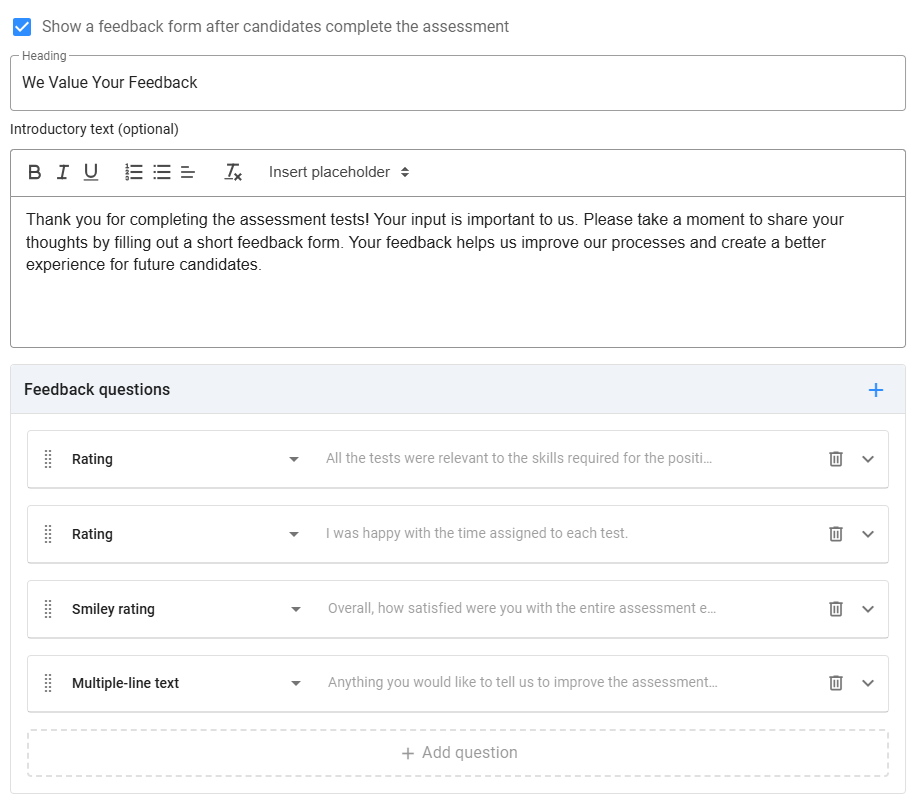
Feedback forms provide candidates with an opportunity to share their experiences, helping you refine assessments and enhance the hiring process. To include a feedback form, select Show a feedback form after candidates complete the assessment and configure the following:
- Heading and Introductory Text: Displayed at the top of the form. The heading is required; the introductory text is optional.
- Questions: Add various question types, such as Checkbox, Single choice, Multiple choice, Rating, or Text. Questions can be marked as required, and hints can be added for clarity.
Preview
Preview the assessment to see the candidate-facing views, including the Welcome message, assessment rules, feedback form (if applicable), and Thank-you message.
- Welcome View: Displays the Welcome message and assessment rules, which adjust dynamically based on the settings.
- Feedback Form: Displays questions and allows you to test labels, fields, and validation rules. Use the Bypass Validation Errors option to move through the form without completing validation.
- Thank-you View: Configured within the assessment settings, this message is always displayed after completion.
Note: The tests themselves are not interactive during the preview.
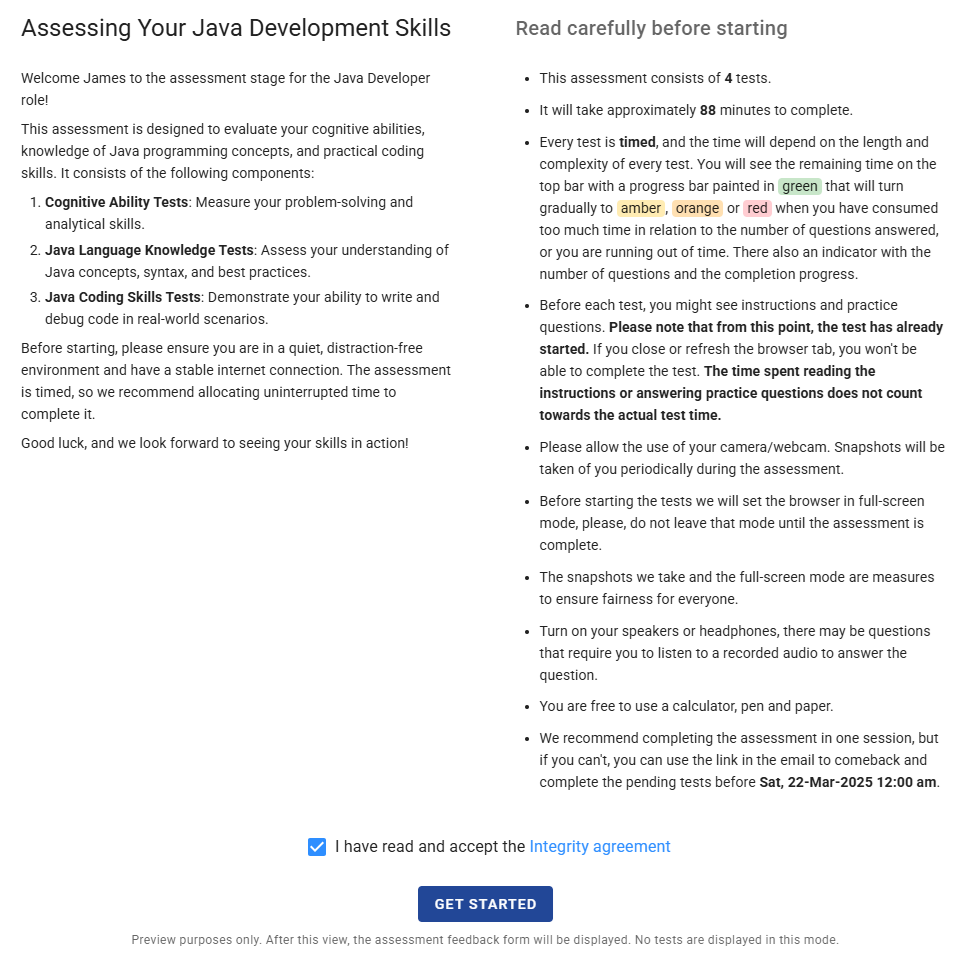
The candidate experience
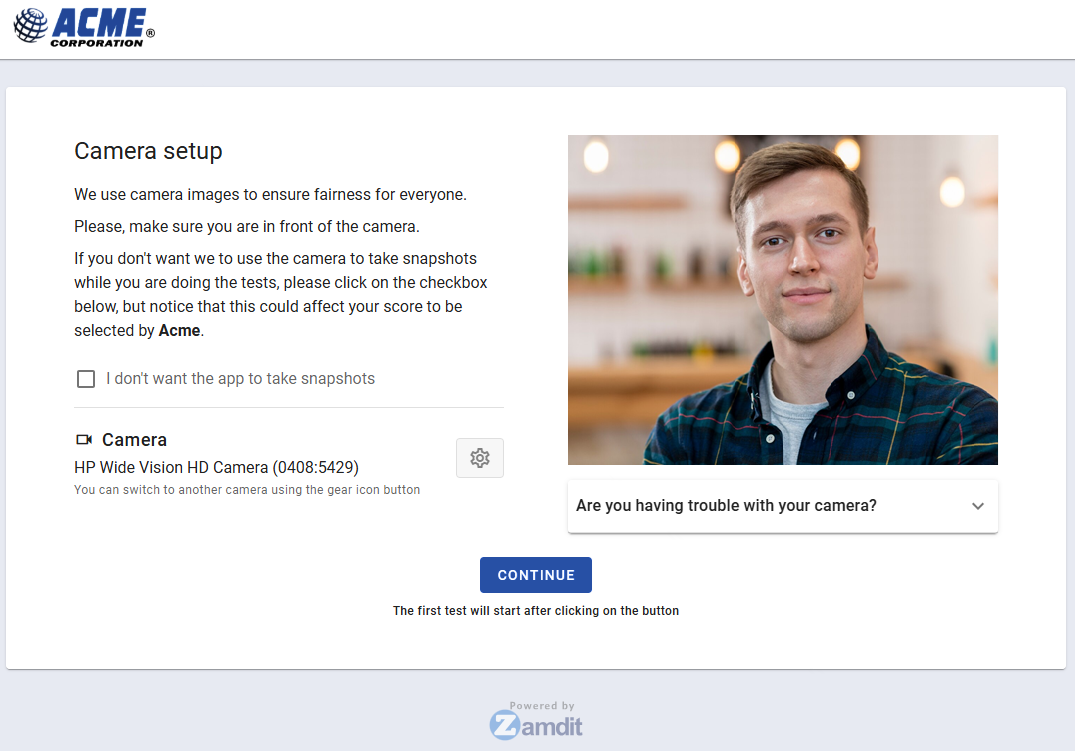
When candidates take the assessment, their journey begins with the Welcome view, which includes the assessment rules. After this, candidates are directed to a camera setup view where they can configure their camera for snapshots or choose to opt out of this feature.
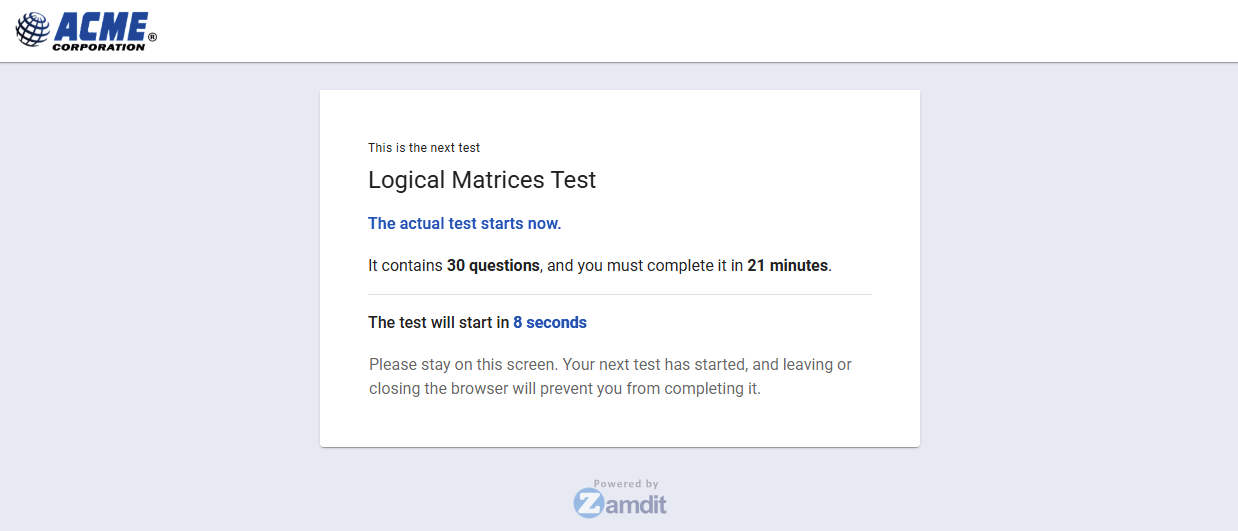
During the assessment, the system guides candidates with step-by-step instructions and messages. These messages cover the transition between stages, including practice questions and actual tests, ensuring a smooth and clear progression.
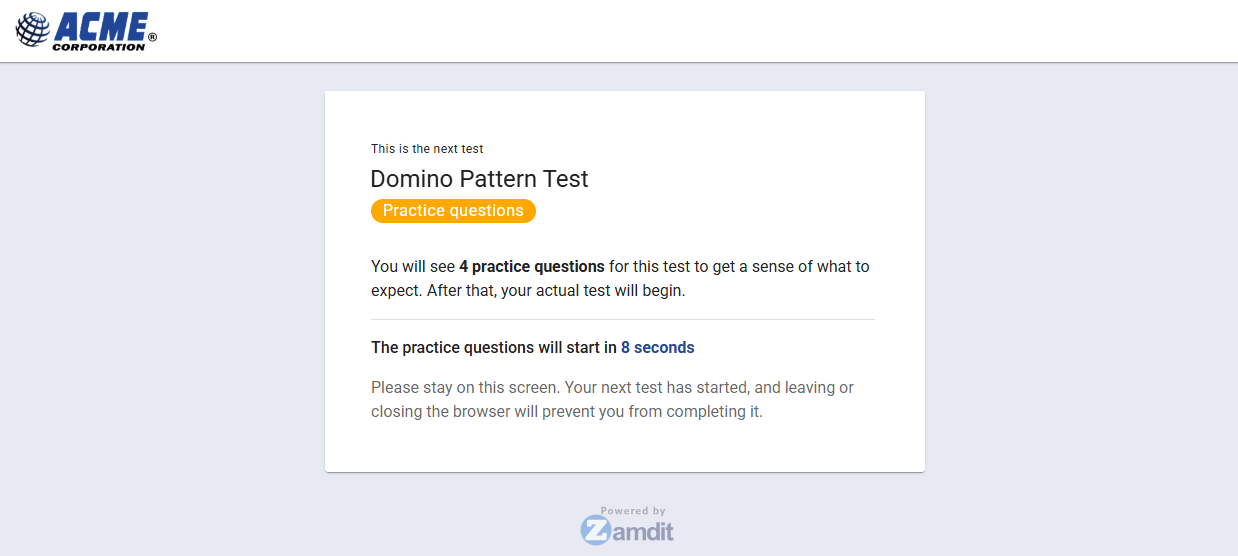
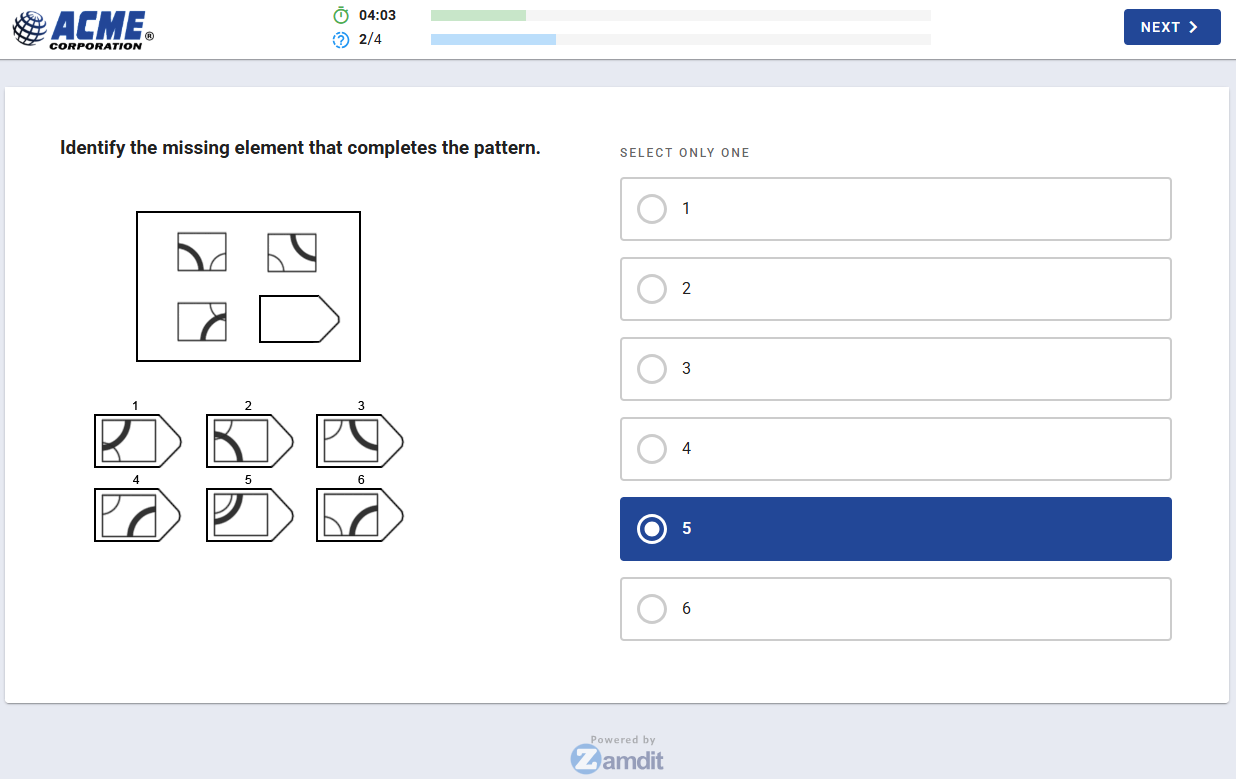
Transition messages between steps are displayed for a few seconds with a countdown timer. When introducing the actual tests, the system provides key details such as the number of questions and the maximum time allowed to complete each test.
The test-taking view is similar to the one shown in test previews, with the addition of a progress bar at the top. This bar displays real-time information about the remaining time and the number of questions left to answer.
Between tests, candidates may take breaks. If continuous completion is required, the break time is limited to the value specified in the Maximum Rest Time Between Tests setting. Otherwise, candidates can proceed at their own pace, starting the next test when ready or pausing the assessment to resume later.
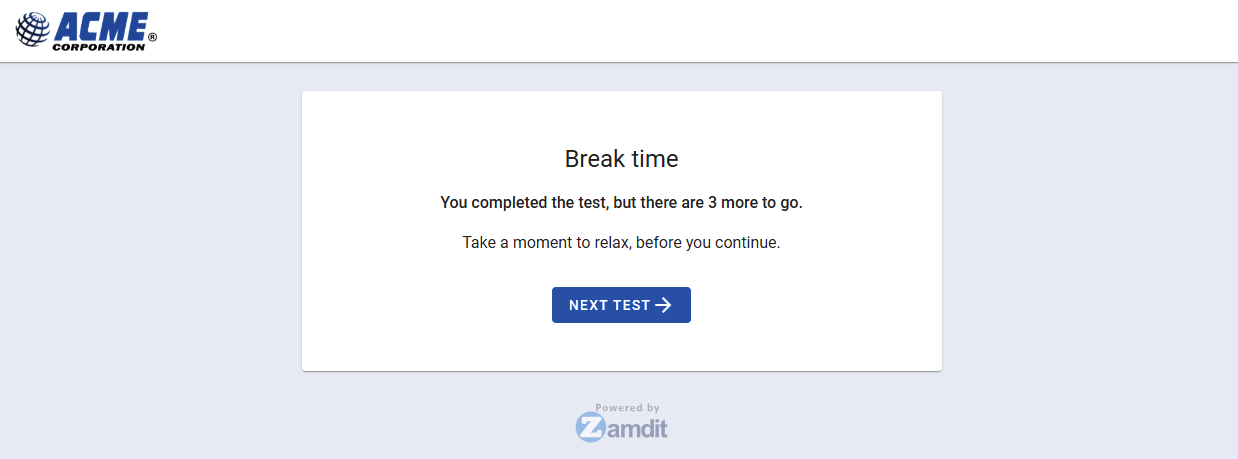
After completing all tests, candidates are presented with the feedback form, if enabled, followed by the Thank-you view to conclude their assessment experience.
View Feedback Answers
If the assessment includes a candidate feedback form, you can view the responses on this page. To access them, click the "View Feedback Answers" button located at the top right corner. This opens a pop-up window containing a detailed report. The report includes summary charts for rating questions and a table with all submitted answers—note that all responses are anonymous.
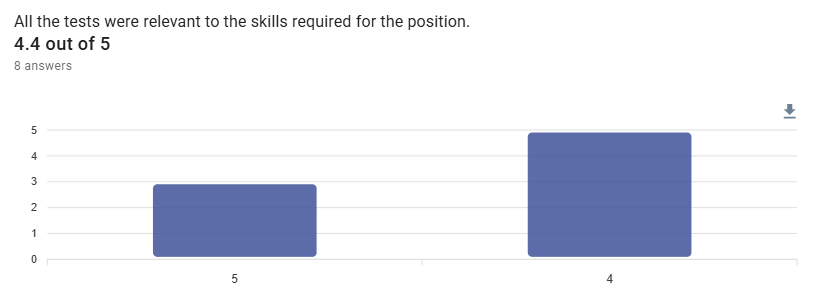
Rating Questions
For rating questions, column charts display the total number of responses for each rating value. At the top of each chart, you’ll also see the average rating, helping you quickly identify general trends in candidate feedback.
Candidate Answers
The final section of the report includes two tables:
- A list of all questions in the feedback form, including the answer type and any relevant configuration details.
- A table displaying each candidate's responses to the questions. Each row represents one candidate, and each column corresponds to a specific question, using the question number as the column header (matching those in the first table).
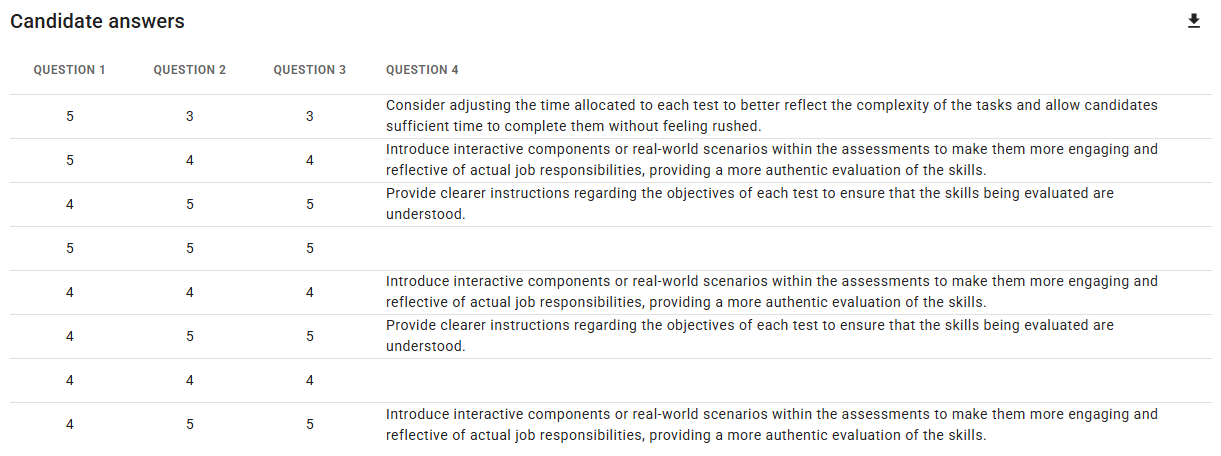
Reviewing this feedback can provide valuable insights into the candidate experience and help you identify areas for improving your hiring process. We recommend regularly checking this section to stay informed and ensure a positive journey for all applicants.
Best practices for creating assessments
Follow these best practices to create effective and engaging assessments that provide meaningful insights into candidates' abilities:
Align Tests with Job Requirements
Choose or create tests that directly measure the skills and knowledge needed for the role. Avoid including unrelated assessments to ensure candidates perceive the process as relevant and fair.Use a Mix of Question Types
Incorporate a variety of question formats, such as multiple-choice, coding challenges, and text-based responses, to assess different skills and perspectives. A balanced mix keeps candidates engaged and offers a broader view of their capabilities.Define Clear Time Limits
Set reasonable time limits for tests based on their complexity. Ensure candidates have enough time to showcase their skills without feeling rushed. Use the "Extra Time" field for flexibility when needed.Preview Before Publishing
Always use the preview feature to check the flow, content, and functionality of the assessment. This ensures the candidate experience aligns with your expectations.Avoid Excessive Length
Keep assessments concise to respect candidates' time. Limit the number of tests and questions to focus on evaluating the most critical aspects of the role.Communicate Expectations
Clearly define the expectations in the Welcome message. This helps candidates feel prepared and reduces the likelihood of technical or procedural confusion.Encourage Feedback
Include a candidate feedback form at the end of the assessment to gain insights into their experience. Use this feedback to improve the assessment process for future candidates.Test Your Assessments
Before going live, have a colleague or team member complete the assessment to ensure everything works as intended and that the rules and messages are clear.
By following these best practices, you can create assessments that not only evaluate candidates effectively but also leave a positive impression of your organization.