
Email Settings
ℹ️ Information
This feature is accessible only to the Account Owner.
In this section, you can configure the senders and master templates for emails sent on behalf of your company to applicants, candidates, reviewers, external recruiters, and references.
We use Twilio SendGrid for sending and receiving emails. Although you can use a custom email domain, sending emails through your own servers is not supported. All emails are stored on our servers and are deleted 6 months after the associated job has been archived.
Email domain
Emails are sent using the domain jobs.zamdit.com, with a customizable username. For example, if your chosen username is acme, emails will be sent from acme@jobs.zamdit.com.
By default, the username will be the company subdomain specified when creating the account. However, you can change this later as long as the username hasn't already been taken by another company using Zamdit. If you change the username after emails have been sent, you may miss replies to the previous email address. Therefore, it’s recommended to define your username before sending any emails.
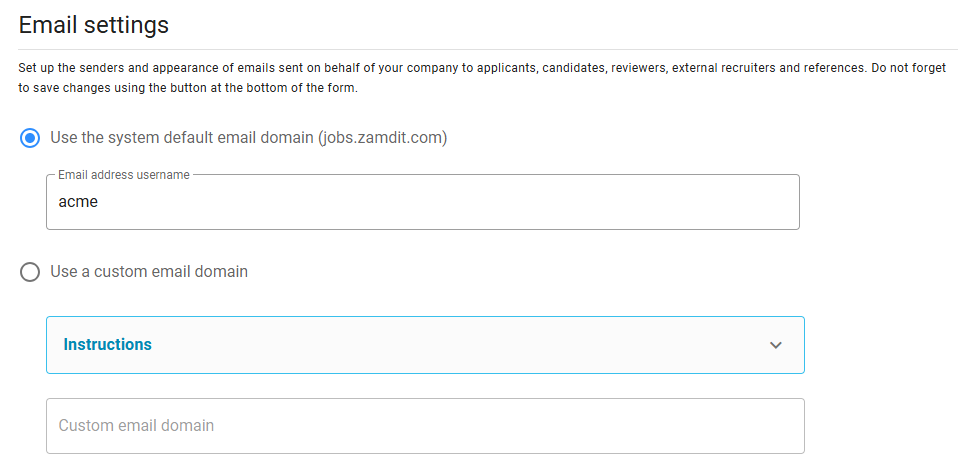
If your subscription plan is Standard or higher, you can use a custom email domain.
Custom email domain
Setting up a custom email domain is straightforward, but requires completing a few steps.
First, we need to authenticate your domain in SendGrid. Once you've entered and saved your custom email domain, we will send you an email within 24 hours (on business days) with instructions to add DNS records provided by SendGrid. This verifies domain ownership and grants permission for the sending server to send emails on your domain's behalf. By adding these DNS records, SendGrid can also manage your SPF and DKIM records.
Once you’ve added the DNS records, notify us so we can verify them. Upon successful verification, we will update the status of your custom email domain, and all emails will be sent using your domain.
To process incoming emails (replies), the email domain must be exclusively used for this purpose (it can be a primary domain or subdomain). You’ll need to create an MX record with a priority of 10 and point it to mx.sendgrid.net.. If your DNS manager does not have a field for priority, simply prepend the address with 10, e.g., 10 mx.sendgrid.net..
⚠️ Warning
If the MX record isn’t set up, you won’t be able to receive replies. Please note that lost incoming emails cannot be recovered.
In addition to the custom email domain, you must provide the default username and optionally a Display name.

While the setup is being processed, emails will be sent using the system’s default domain and templates.
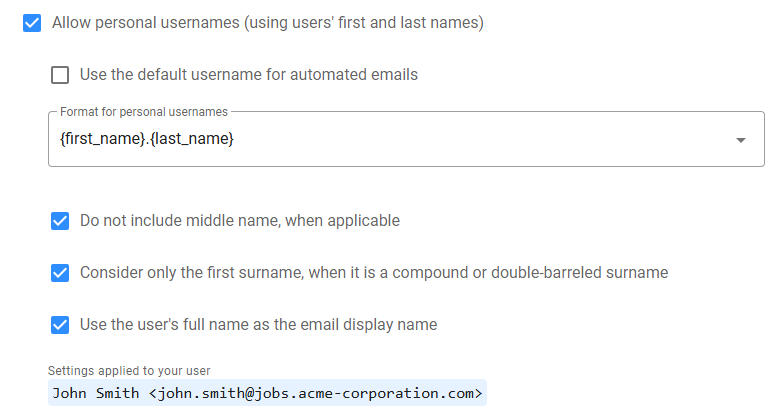
Personal usernames
When using a custom email domain, you can enable personal usernames. This option allows the system to generate email addresses based on users’ first and last names, personalizing the sender. Automated emails, which are always sent on behalf of a user, can be configured to either use personal usernames or the default username by enabling the Use the default username for automated emails option.
You can choose from over 10 formatting options for personal usernames, with additional options for handling middle names and compound surnames. The system will display a preview of the sender’s email address for your user, based on the selected format.
Email master templates
Custom email domains require customized email master templates. You can either define your own templates or use the system’s default, which is based on your company’s logo and primary color.
If you deal with multiple languages, you can add a template for each language containing language-specific text. Otherwise, a single template will suffice.
System default templates
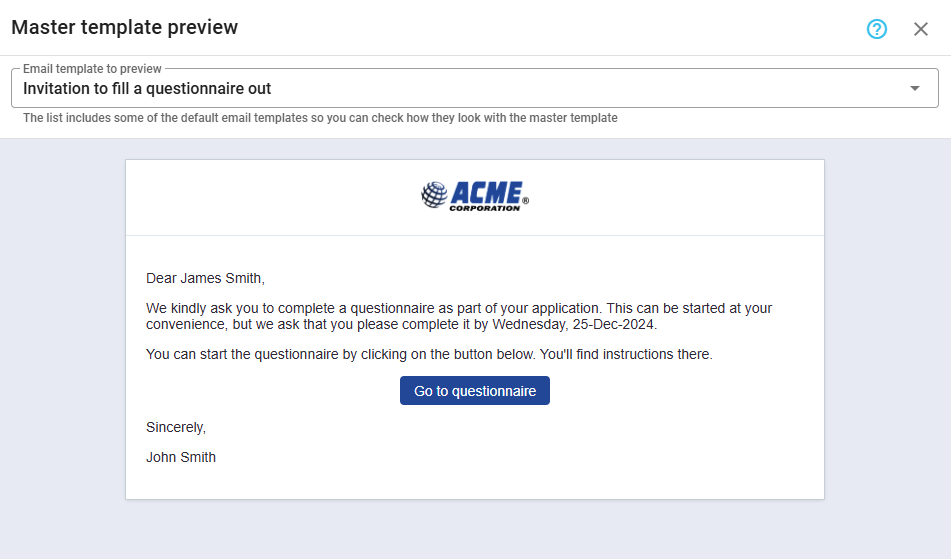
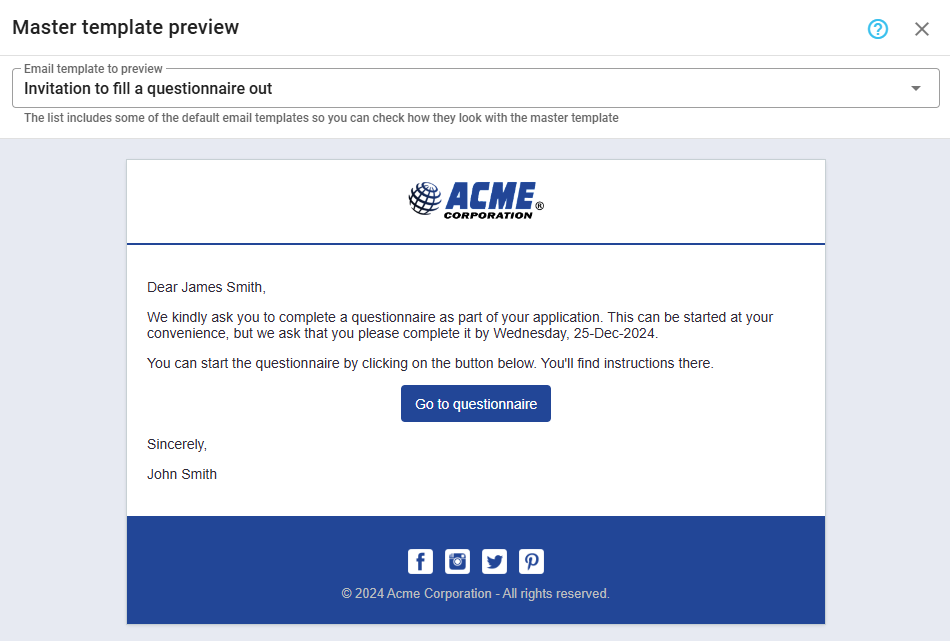
To use the system's default templates, select the option Use the system default email master templates. A preview button on the right lets you see how the template will appear for different types of emails.
Custom templates
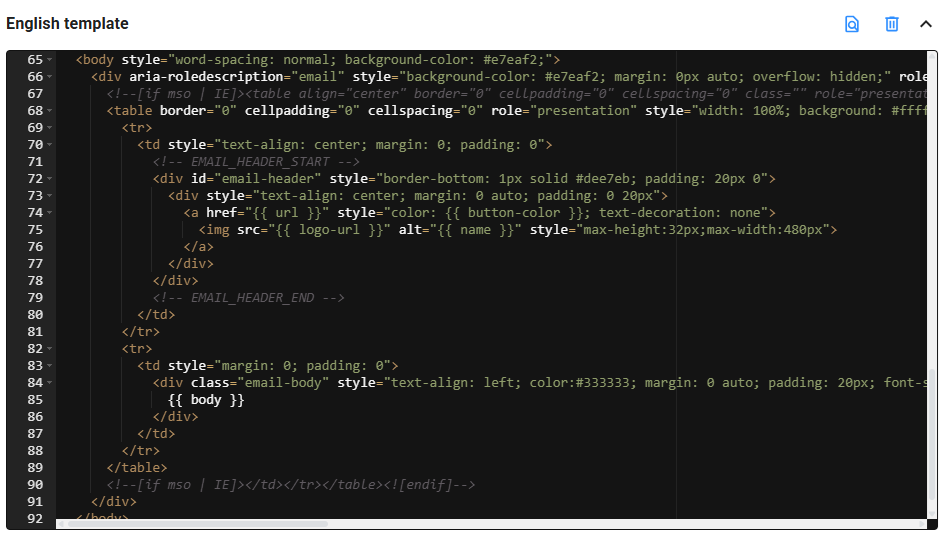
To use your own templates, select Use custom email master templates. A button on the right allows you to add your templates. You’ll need to provide the HTML code for each template, following our guidelines on placeholders, styles, and regions. To adjust the HTML editor settings, click the button with the gear.
After providing your template’s HTML code, you can preview how it will appear for different types of emails by clicking Preview.
Placeholders
In custom templates, you can use the following placeholders. The body placeholder is mandatory:
- body: This is where the email content will appear.
- button-color: Your company's primary color in hexadecimal format. If the lightness of the color is greater than 40, a color with the same hue and saturation is used, but lightness equal to 40.
- button-color-hover: A darker version of the button color, calculated by reducing the lightness by 5, unless the base color is too dark (lightness under 10), in which case the original color is retained.
- url: Your company's website URL.
- logo-url: URL of your company's logo (hosted on our servers).
- name: The name of your company.
- current-year: The current year when the email is generated.
Styles and regions
Auto-generated action buttons are rendered as HTML anchor elements with the CSS class button. To customize their appearance, define this class in your styles.
Since CSS support varies across email clients, the system also applies inline styles based on the properties defined in your .button class.
Keep in mind that many email providers do not support pseudo-classes such as :hover, so these styles may not be applied.
Example of button class styles:
.button {
  background: #2e8eff !important;
  font-size: 14px;
  color: #ffffff !important;
  text-decoration: none;
  padding: 7px 14px 6px 14px;
  border-radius: 4px;
  border: 0px;
  display: inline-block;
  font-weight: 400;
  transition: all 100ms ease-in;
}
.button:hover {
  background: #0075e2 !important;
}
If the template includes a header or a footer, we recommend marking those sections with id="email-header" and id="email-footer", respectively. This allows the system to detect and remove them from replies during rendering, helping keep email threads clean and easier to read.
Please note that some email providers may modify or rename HTML IDs, so this approach may not work reliably for replies coming from those providers.